Hello readers,
I just wanted to let you know that I am slowly going to be moving to a different platform that will fit my current needs better.
My plan is simply to rewrite and improve some of the posts - which will move to my new blog site. I will also be adding new content based on questions or comments I get from other quilters. Other posts I will leave here as is. Enjoy the photos and content.
Feel free to contact me directly with questions, to show off your finished quilts, or other quilt related comments at Indianaquilter40@gmail.com
I love to quilt - and we are talking any of the steps from buying the fabric through the last stitch in the binding or tag. I have had this blog for many years simply as a way to keep a basic journal of what I am doing or have done in quilts and quilt related activities.
I am hoping to write better posts on the new site and be a better mentor and encouragement to the quilters out there who are looking for new ideas, helpful tips, and just "you can do it" attitude. Quilters are great people who share and help each other.
My new address is: www.indianaquilter40.com
Come visit soon.
Friday, October 11, 2019
Monday, September 23, 2019
STRIP QUILT TOP (or how to make a really fast quilt top)
STRIP QUILT TOP (or how to make a really fast quilt top)
I am back from vacation and looked ahead at the calendar for October - well shucks, I need a smaller quilt top to do a hand quilting demo the very first Saturday of October. Now what?? I guess this is one reason I have so much fabric stored.......
Anyway, I went thru all the interesting fabrics or fabric panels to see if anything I had on hand would work for a historical demonstration (1820ish) and found a border print that if left intact would work as a strip quilt.

After ironing the fabric, I trimmed off enough to make a section that was 42" wide x 54" long.
I found a solid blue cotton that matches the blue that is in the paisley strips and cut enough 1.5" strips of it to make a narrow inside border all the way around.

The outside border is a dark red (with a very small white print) that makes a nice frame for the top. I cut 4" strips of this fabric and added to the top.

I ironed it and the top is now 50" x 60". Now to baste and hand quilt.
**For more info on this quilt, go here on my new blog**
**
Saturday, September 21, 2019
RETURNED FROM TRIP AND READY TO GO AGAIN
I was planning on doing mostly applique during this time - it's easy to stop and start, and picking up where I left off allowed me time to walk, visit, and look at the scenery. I even did some more of a counted cross stitch project I started last year while in Maine. I work hard for 50 weeks a year to have these two precious weeks a year to totally relax and do only what I enjoy (phone and internet connection was not reliable so even technology was put away).
 |
| I can't decide if I want leaves or not..... |
 |
| So, combining 3 sections of small tumblers and 2 sections of flowers with solid-colored borders between - still a work in progress. |
It has been years since I heard loons, but they were a constant on this lake. Wonderful, eerie call that they make just made the time at the lake even better.
This trip was a good reminder to take some real time off - from work, stress, technology, day to day life, and really just relax. I woke rested and ready to take on each day - not because I had to, but because I wanted to. I am not a movie/TV watcher normally, but as a group we watched "chick flicks" each evening (usually something with Sandra Bullock) and it felt so good just to laugh and joke. Wow didn't even feel guilty for not doing anything while just sitting there...
So, here is a few photos of the scenery around the cabin deep in the Maine woods. It was rustic, fun, and stress free.
 |
| Early evening - the loons are calling, but too far away to get a good photo |
 |
| Mid-day view from the picnic table |
 |
| Beautiful fall color |
 |
| On the outhouse door - there was a tin can inside for $$ |
 |
| This photo might inspire me to try a landscape quilt |
For more info on this quilt, go here on my new blog.
**
Thursday, September 5, 2019
OFF TO A QUILT RETREAT
Happy Fall
 |
| View from Haystack Mountain in northern Maine 9/1998 |
 |
| Peace and calm in northern Maine - 9/1998 |
It is September again and it is time to endure flying (I remember when it was fun to fly...) so I can see family in Lancaster, PA for a few days before heading up to northern rural Maine for the annual quilt retreat. We decided to rent a cabin deep in the woods on a lake this year instead of meeting at SB's home.
We have been sewing together for over 20 years and started back when Loring AFB was still up and active - about half of the group are local ladies and the other half of us were Air Force wives. We did all kinds of sewing projects together and have just continued the tradition once a year when we can all get together.
However, the internet connection is very undependable there so I may not be posting anything until I return in two weeks. In the meantime, I will take lots of photos and hopefully even get one or two of the four projects I am taking along completed - wow, wouldn't that be something...
The three projects I am taking are:
1. English paper piecing hexagons in two sizes to work on "flowers" to applique to "vines" for part of a scrap quilt. I have the background fabric cut, and the vines already sewn down so just need to add the flowers. There is more info in this post on my new blog.
2. Pumpkin Spice - this wall hanging needs the pumpkins appliqued down and something done about an outside border and it will be ready to quilt.

However, the internet connection is very undependable there so I may not be posting anything until I return in two weeks. In the meantime, I will take lots of photos and hopefully even get one or two of the four projects I am taking along completed - wow, wouldn't that be something...
The three projects I am taking are:
1. English paper piecing hexagons in two sizes to work on "flowers" to applique to "vines" for part of a scrap quilt. I have the background fabric cut, and the vines already sewn down so just need to add the flowers. There is more info in this post on my new blog.
 |
| The bigger size hexies - scraps being put to beautiful use. |

3. A strip quilt trying to use up the leftovers from several log cabin quilts. This one is more an idea at this point so I guess we will see how it works out. For more info, go here on my new blog.
In the meantime, please read older posts you haven't gotten to yet, and just have a great time quilting. The time will fly by fast, and I will be back to show off the projects and give some basic directions before you know it.
Another place for quilting ideas is my Pinterest account.
**
Saturday, August 31, 2019
PUMPKIN SPICE
 |
| Source: https://www.pexels.com |
Fall/Autumn is really the season I decorate for. I put out fall themed quilts, pumpkins, corn stalks, artificial leaves and ceramic small pumpkins, candles in crocks, and photos of barns in the fall. What can I say except that fall is my favorite season.
I saw this pattern in the magazine Primitive Quilts and Projects - Fall 2013 and just had to make it.

 |
| Primitive Quilts & Projects Magazine - Fall 2013 - Page 52-55 |
However, I tend to start with a pattern and then go off in my own direction based on what materials I have, my mood at the time, and what I want to do with the finished project.
In this case, I wanted something longer and a few inches wider to fill a particular quilt hanger in my dining room. These are the sizes I cut:
- 3" squares for the nine patch blocks
- 7.5" alternate blocks
- 6" border
- Purchased .5" green bias tape (I machine sewed mine down - I'm in a hurry to get hand appliqueing the pumpkins)
My top went together quick and I am now ready to do the hand applique of the pumpkins. I will probably add an outside border but at this point I don't know what fabric or size.
 |
| Before the border |
 |
| After the adding the border - 32" x 46" |
There is more info on this quilt here on my new blog.
**
Monday, July 29, 2019
COLONIAL TIMES 2
COLONIAL TIMES 2:
I pieced the English paper pieced sections from Jan. 2013 to May 2016. It's pleasurable and there was no hurry. I alternated dark and light blues from my scrap bin. The strips of hexagons are appliqued to plain unbleached muslin.
I pieced the English paper pieced sections from Jan. 2013 to May 2016. It's pleasurable and there was no hurry. I alternated dark and light blues from my scrap bin. The strips of hexagons are appliqued to plain unbleached muslin.
I hand appliqued the middle 5 strips and machine appliqued the 2 outside strips just to be creative. Here is the link to the discussion on the paper piecing.

Below is a photo of the finished top. Made of cottons. Size is 86" x 94".

I like the choice of fabrics and the look of this top. It does look historical and might end up being a quilt to hand quilt at a demonstration.

Below is a photo of the finished top. Made of cottons. Size is 86" x 94".

I like the choice of fabrics and the look of this top. It does look historical and might end up being a quilt to hand quilt at a demonstration.
Wednesday, July 10, 2019
DOUBLE WEDDING RING

I hand quilted this double size Double Wedding Ring for a customer (KD of Esperance,NY) with 450 yards of stitches. The owner wanted it heavily quilted so each square was outlined stitched, the arcs were stitched on both sides, the pieces inside the arcs were quilted, and the large blank area inside the arcs was quilted in interlocking rings. I used the top of a drinking glass as the pattern for the interlocking rings. The rest of the quilting was eye balled a quarter inch.
The top was what appeared to be 1930's and 1940's cotton fabric with muslin. The batting was some sort of poly mix and the backing was muslin to match the front. I did not bind the quilt.
Quilted Oct. 1995 - Jan. 1996 in Laurel, MT.
In my scrapbook, this is quilt #156.
Tuesday, July 9, 2019
ENGLISH PAPER PIECED GRANDMA'S FLOWER GARDEN (or a take along project made from scraps)

I pre-cut the fabric into manageable squares and used "re-purposed" paper (already printed on one side) for the stabilizer to sew the fabric too. All the cutting was done at home prior to the trip. I picked a spool of thread that I had on hand and just baste the fabric to the paper as the paper will come out once the "flower" is appliqued to a background block.
 |
| "Flower" from front - basted to paper and petals are whip stitched together |
 |
| Flower block reverse |
This is another way to use up the scraps I seem to collect by just putting two pieces of fabric is a dark corner or box together. I am pretty sure that my scraps multiply without any help from me :) When I have enough flowers to make a quilt, I will applique the flowers down to a background fabric and then cut away the back enough so that I can get the paper out after pulling out the basting stitches.
These are easy to make and really good for a project that you just want to take along and do as time allows. These are large petals (about 3" each) - I have seen them in everything from dime size to about 5" each. Find a pattern that works for your comfort and desired project size.
 |
| Fabric hexagons to baste fabric to for making petals. |
I like to do English paper piecing - here is a link to a previous project: https://indianaquilter40.blogspot.com/2014/01/english-paper-piecing.html
Thursday, July 4, 2019
WASTE NOT, WANT NOT (or how to tips for recycling and reusing in your sewing room)
Fast forward to now........I have a budget for quilting and I rarely go over that monthly amount. In fact, I usually do not spend it all so that gets saved for something big that I might want for quilting (I usually save it toward my trip to the quilt show in Paducah, KY each spring). That being said, I do not want to spend money on organizing or storage for my sewing room - I would rather use items I can get free or second hand or already have. I want to spend money on fabric, patterns, or quilting.
I was given this big old wooden desk if I would just take it away. I should have refinished it first but I was excited to have all the drawers and space to sew. I got it because I saw it sitting outside of a house and asked if I could take it. The owner was thrilled. It isn't pretty but it sure is functional and other than being scratched up nothing was wrong with it. My husband says it is from the 1950's. Lesson: Ask, the worst you can be told is "no".

 |
| Then - real shoe boxes |
 |
| Now - gradually moving to plastic boxes as I find them second hand |
Jars are great for storing needles, thread, buttons, pins, pencils or markers, etc. I have lots of canning jars to use, but sometimes I find pretty jars for almost nothing. I found a dozen of these nice looking decorative jars for 50 cents a piece at Goodwill. Tip: check out second hand sources for storage or organizing items - think outside the box. How can you re-purpose items for your own use??

Peg boards are great items for storing sewing tools. This one was given to me along with all the pegs. It is wonderful for so many items I use frequently while sewing. The items each have a peg and are ready when I need them.
 |
| Rulers, stencils, scissors, rotary cutters all have a home now |

When a friend got rid of her gardening magazines, I saved her throwing out these cardboard magazine organizers by bringing them home and using for quilting magazines. The binders for my quilting scrap books are from Goodwill at 50 cents to $1 each.

So as any quilter can tell you, there are tiny scraps of fabric and batting that really are too small to use and so end up in the trash. Where I live the Humane Shelter always needs rags and stuff that can be used for bedding for the animals. Years ago I started making a bag from left over fleece (sew 3 sides like a pillow case) and keeping it on the cutting table. As I have tiny scraps they go into the bag. When it is 2/3 full I sew the top shut and there is a soft animal bed that is completely washable and machine dryable. The shelter can't get enough of them and any size is appreciated.
 |
| Soon to be an animal bed for the Humane Shelter |
People donate all kinds of fabric to me for the donation quilts I make. What I can use is organized in a closet (separate from my own fabric) and what I cannot use is given to others, or the Humane Shelter.
I make it a game to figure out how to re-use or re-purpose items.We throw away very little each week. Look around your sewing area or house. How can you re-use items instead of throwing them away? Don't hoard but do re-purpose items. Save money and the environment in one swoop.
Tuesday, July 2, 2019
DRESDEN PLATE AND FLOWER GARDEN QUILT #2
This is the second quilt I have hand quilted for a customer (PB of Brazil, IN) who made this very unusual quilt from a mix of Dresden Plate blocks and Flower Gardens blocks that she had on hand. It is similar to the first one that I did earlier in 2019. You can see the first one in a previous post at https://indianaquilter40.blogspot.com/2019/05/dresden-plate-and-flower-garden-quilt.html
 |
| Final stitch went in on June 29, 2019 |
For the Flower Garden blocks she did an added dimension of appliqueing a block under the flower garden block and between the solid color block. The sashing is only vertical between each strip of 3 blocks. I don't know what the story of the actual blocks are but I am very certain the prints are real 1930's feed sacking and fabrics due to the feel, colors and designs.
Size: 65" x 76".
Materials: 100% cotton top and backing, and a poly/cotton batting. The batting had enough poly to make it fairly easy to quilt.
Hand quilting: The customer had no real idea what she wanted quilting-wise, and left the choices to me. I debated about an all over design, but finally opted for quilting around and in the blocks themselves as it really made the design of the blocks stand out. There are 164 yards of quilting in this quilt. Instead of a rope design in the sashing like in the first one, for this one I simply did straight lines every 3". This way the quilts (who are going to her daughters) are not quilted exactly alike - similar but different.


Here it is still in the frame with only one row to quilt.........

Thursday, June 27, 2019
AN OLDIE BUT A GOODIE........(BOOK)

The website for Fons & Porter is here: https://www.quiltingcompany.com/
They also have a wonderful quilt magazine (Love of Quilting) that is one of the few quilt magazines I have subscribed to for many years - fun patterns and projects from beginner to expert. See that here: https://www.quiltingcompany.com/store/love-of-quilting-1-year-subscription
Tuesday, June 18, 2019
SHIPS (another panel quilt)
 |
| Distant cousin and wife accepting quilt |
In my scrapbook this is quilt #152.
ALBUM QUILT
This album quilt was hand quilted for a customer (SB, Maine). She pieced it from fabrics that had a very soft look out of 100% cottons. Some of the blocks were signed by other quilters in her life. The back was plain muslin. The finished size was 45" x 60". I don't remember exactly how I quilted it, but I put in 80 yards of hand quilting during Aug. 1995. I've worked on many quilts with and for her, and she likes a cotton/poly mix for batting.

After she put the binding on, she sent me this photo to let me know how it looked and that she was very satisfied with the quilting.
SB is a very skilled needlewoman, and this quilt is a good reminder to all of us that quilts don't have to be complicated to be beautiful.
In my scrapbook, this quilt is listed as #151.

SB is a very skilled needlewoman, and this quilt is a good reminder to all of us that quilts don't have to be complicated to be beautiful.
In my scrapbook, this quilt is listed as #151.
HEART OF AMERICA (panel quilt)
Heart of America was a panel that I purchased and added the outside flag border to it in Oct. 1995. It was machine quilted by BE of Joliet, MT in 1996.
It was a poly/cotton panel with a cotton border. The batting was poly. The back was plain muslin. Size: 39" x 38".
I have found over the years that using a panel as part of a quilt is an easy way to make a quick project. A single border can be used (like here) or several borders, or several borders and blocks that coordinate with the panel.
After we moved to Indiana, I needed a quick baby shower gift for a neighbor (KC) in 1999 and gave her this.
In my scrapbook as quilt #155.
It was a poly/cotton panel with a cotton border. The batting was poly. The back was plain muslin. Size: 39" x 38".
I have found over the years that using a panel as part of a quilt is an easy way to make a quick project. A single border can be used (like here) or several borders, or several borders and blocks that coordinate with the panel.
 |
| Hanging inside after completion |
 |
| Hanging outside on a cabin wall at Fowler Park, Vigo Co., IN 1998 |
In my scrapbook as quilt #155.
Saturday, June 1, 2019
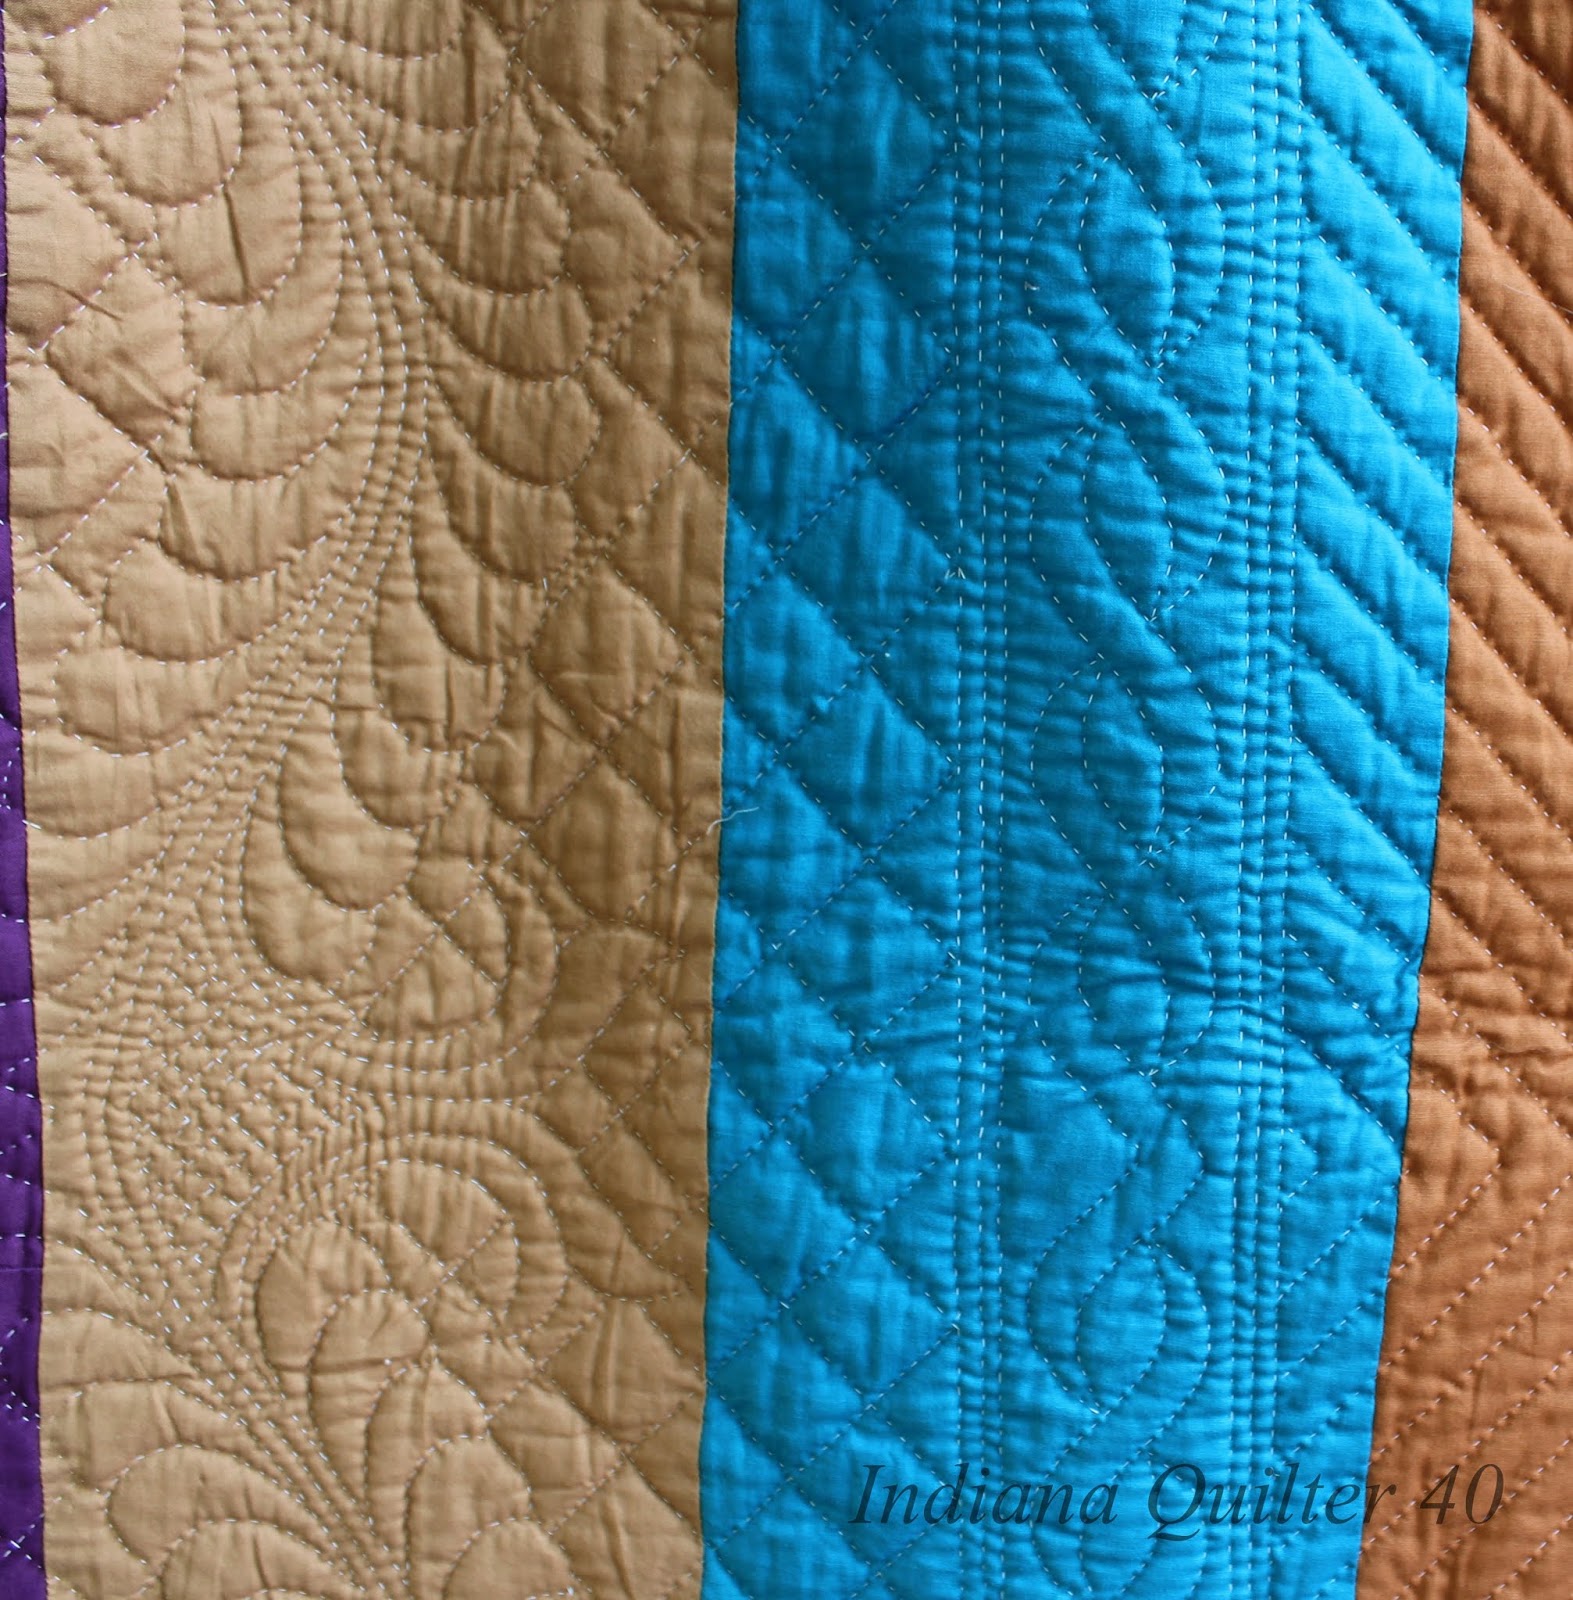
AMISH BAR QUILT (Part 2)
My Amish Bar Quilt is finally complete!!The original post about this quilt was in 2013 at: https://indianaquilter40.blogspot.com/2013/10/amish-bar-quilt.html
I have finally gotten the hand quilting, binding, and tag done so here are photos of this beautiful reversible quilt. It has about 5 spools of cream quilting thread and a wool batting (Hobb's Tuscany line).
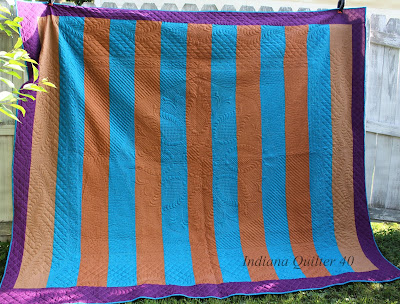


I purchased the pre-printed top that I used to hand quilt this quilt from The Stencil Company at this link: https://www.quiltingstencils.com/ . This company has all kinds of wonderful quilting stencils and pre-printed designs from 18" square to queen size. I have purchased from this company for years and have always been happy with the products and service.
I have finally gotten the hand quilting, binding, and tag done so here are photos of this beautiful reversible quilt. It has about 5 spools of cream quilting thread and a wool batting (Hobb's Tuscany line).


I purchased the pre-printed top that I used to hand quilt this quilt from The Stencil Company at this link: https://www.quiltingstencils.com/ . This company has all kinds of wonderful quilting stencils and pre-printed designs from 18" square to queen size. I have purchased from this company for years and have always been happy with the products and service.
Subscribe to:
Posts (Atom)